Create a new folder on your hard disk and copy all files from the memory cards into it (eg. C:\YourName\Documents\Photos\2008\Holiday\Maldives).
Photos
Cameras usually save photos in the JPEG format which compresses the image to about 1/10 of the original size. The quality slightly worsens every time you edit and save the image again (recompression loss). In theory you should do all post-processing steps consecutively and save the image just once in the end. But as home user this minor quality loss is insignificant so that I am going to describe the convenient way.
Sort out photos
Sift through your photos and only keep the best. I usually delete 60-70% of my shots.
Rotate photos
Load the first photo into "Windows Picture & Fax Viewer" (the default Windows XP image viewer) or "Windows Photo Gallery" (Windows Vista). Rotate portrait photos by pressing "Ctrl+K [clockwise], Ctrl+L [counter-clockwise]" (Windows XP) or "Ctrl+Period (.) [clockwise], Ctrl+Comma (,) [counter-clockwise]" (Windows Vista).
Create subfolders
 Create a new subfolder "Favourite photos" and move the excellent photos in there (about 1/4 of the best). Create a subfolder "Originals" below "Favourite photos" and put a copy of all excellent photos in there before you are going to edit and save all photos under their original names. This enables you to come back to the unedited version some weeks, months or even years later.
Move all videos to the subfolder "Videos".
Crop photos & adjust levels
I use "Photoshop", the market leader for image manipulation. Photoshop Elements
![]()
![]()
is the low-price version of the full product
![]()
![]()
with slightly restricted functionality (but fully adequate for our needs).
You could also use the free software Paint.NET. Although it offers fewer tools to edit images than Photoshop I personally find it more difficult to use.
You should keep the 4:3 ratio during the cropping process to be able to easily order prints at any time.
![]() Photoshop (Elements): File > Open... > Select photo > Open > Rectangular Marquee > Mode: Fixed Aspect Ratio,Width 4, Height 3 > Draw a box > Image > Crop
Photoshop (Elements): File > Open... > Select photo > Open > Rectangular Marquee > Mode: Fixed Aspect Ratio,Width 4, Height 3 > Draw a box > Image > Crop
![]() Paint.NET: File > Open... > Select photo > Open > Rectangle Select > Fixed Ratio, Width 4, Height 3 > Draw a box > Image > Crop to Selection
Paint.NET: File > Open... > Select photo > Open > Rectangle Select > Fixed Ratio, Width 4, Height 3 > Draw a box > Image > Crop to Selection
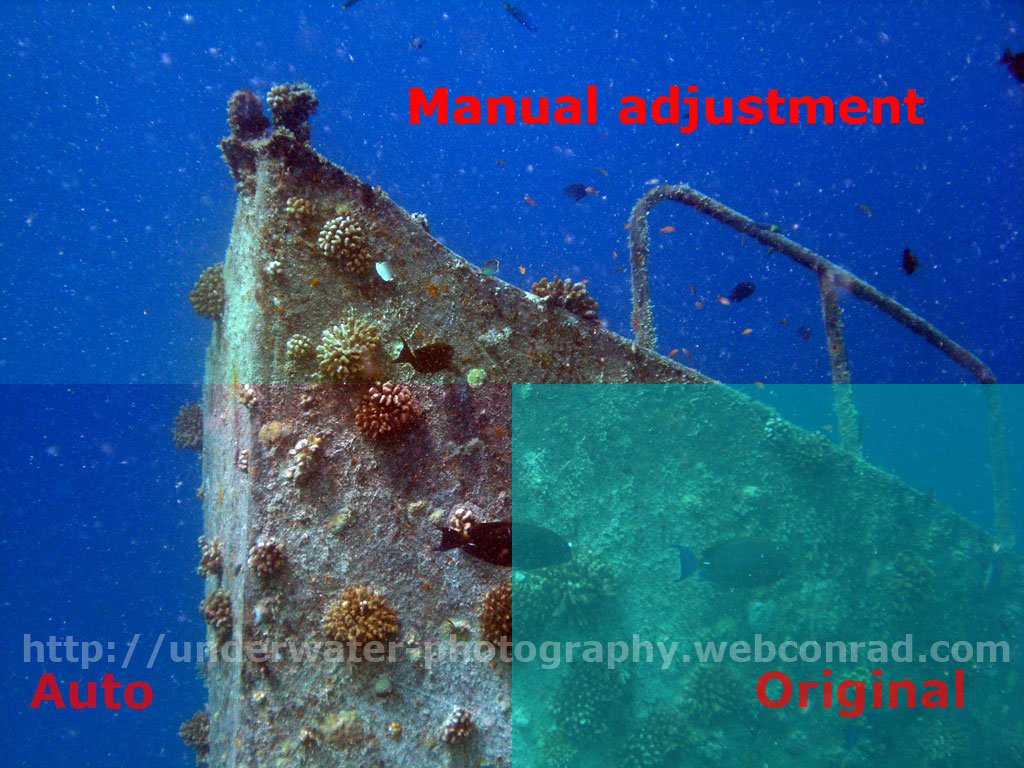
Underwater photos are usually dominated by blue and green tones so that you have to accentuate the reds in the next step.
 Photoshop: Image > Adjustments > Levels... (Ctrl+L) > Auto
 Photoshop analyses the image and adjusts the white and black point. The resulting image is of higher contrast and less blues and greens. If you like it you're done. If you think the reds are now too dominant you can manually adjust the red channel. Click on "RGB" and choose "Red". Move the grey and white sliders to the right until the image looks best.
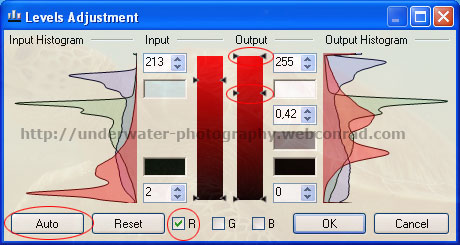
Auto levels rarely doesn't work at all:
On those occasions click on "Cancel" and reopen "Levels" (Ctrl+L). You now have to adjust each channel manually. Move the black and white sliders inwards until they touch the histogram. The grey slider in the middle helps you with the fine tuning.
Photoshop Elements: Enhance > Adjust Lighting > Levels... (Ctrl+L) > Auto
(see above)
 Paint.NET: Adjustments > Levels... (Ctrl+L) > Auto
Paint.NET works similar to Photoshop: Deselect green (G) and blue (B) and move the two sliders a bit down (see screenshot).
Save the image via File > Save (Ctrl+S) in Photoshop (Elements) with qualitiy set to "Maximum (10)" and, in Paint.NET set to "90".
Scale down photos
 A 6 megapixel photo needs about 1,6 MB of storage space. You should't scale down your excellent photos (see step 3) to be able to order prints in poster size any time later. But there is no need to keep full size versions of the rest of the photos. Download the free software Easy Thumbnails and scale down the photos to 3 megapixel (2048x1536) and save about half of your storage space. Open Easy Thumbnails, select the folder you want to scale down and click on settings (see screenshot).
Max width: 2048, Max height: 2048, Resize: Shrink to fit, Algorithm: [Smart], Prefix/suffix: (empty), JPEG quality 90 - Click on "Make All" to start the process.
Reduce noise (optional - just for ISO 200 and higher)
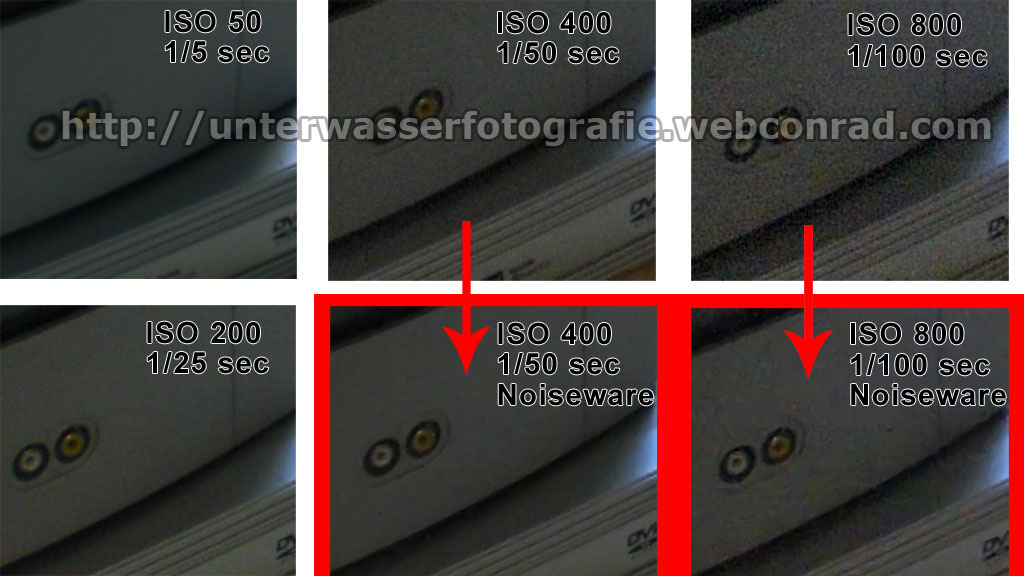 If you had to increase the ISO sensitivity due to difficult light conditions your photos will show noticeable grain. You won't get the quality of an ISO 50 photo out of an ISO 800 photo. But you can still improve the quality appreciably with the free software Noiseware Community Edition Standalone.
 Open the photo via File > Open... and select "Default" (for ISO 400 and below) or "Full (stronger noise)" (for ISO 800). "Go" starts the process and after a few seconds you will see the result. Click and hold the left mouse button down to see the original photo. If you're pleased with the result save the image via File > Save As...
Videos
Sort out videos
Sift through your videos and only keep the best.
Shorten videos
 Cut jittery and uninteresting scenes out of the videos. The free software MPEG Streamclip can shorten H.264 videos easily without having to re-encode the file.
 ![]() Load the videos via File > Open Files... and click on play (see screenshot). Press "I" to set the first cut-point and "O" for the second cut-point. Select Edit > Trim (Ctrl+T) to extract the video sequence between the first and second cut-point. Save the shortened video via File > Save As...
Load the videos via File > Open Files... and click on play (see screenshot). Press "I" to set the first cut-point and "O" for the second cut-point. Select Edit > Trim (Ctrl+T) to extract the video sequence between the first and second cut-point. Save the shortened video via File > Save As...
Cut videos
A decent video with smooth transitions makes a much more professional impression on friends and family as just disjointed video sequences. But not every video editing software is capable of importing H.264 encoded videos. A professional but simple to use software Sony Vegas Movie Studio 9 Platinum Edition
![]()
![]()
(only the "Platinum Edition" can import H.264!)
 Open Vegas and edit the properties of the new video (size, refresh rate ...):
File > Properties... > Template > Match Media Settings > Select video > Open. You can now import your video sequences into the timeline. To adjust the colours right click a video sequence > Media FX... > Sony Color Corrector. You will now see three colour wheels for low, mid and high tones. Move all three white circles a little bit towards the top left corner until the colours suit you. The rest is up to you: transitions, images, titles, background music...
Open Vegas and edit the properties of the new video (size, refresh rate ...):
File > Properties... > Template > Match Media Settings > Select video > Open. You can now import your video sequences into the timeline. To adjust the colours right click a video sequence > Media FX... > Sony Color Corrector. You will now see three colour wheels for low, mid and high tones. Move all three white circles a little bit towards the top left corner until the colours suit you. The rest is up to you: transitions, images, titles, background music...
Vegas can't export
H.264. But that's not a problem at all because you can use another highly efficient free codec instead: DivX. Install the codec and export the video in Vegas via File > Render as... > *.avi > Custom... > Video > Video format: DivX > Configure... > Bitrate: 2000 Kbit/S > OK > Audio > MPEG Layer-3 > 56 Kbits/s, 24.000 Hz, Stereo > OK > Save